Amazon VPC Flow Logs (Parquet)
Overview
- Vendor: AWS
- Supported environment: SaaS
- Detection based on: Telemetry
- Supported application or feature: Host network interface, Netflow/Enclave netflow, Network device logs, Network protocol analysis
Amazon VPC Flow Logs is a feature that provides the ability to capture information about IP network traffic as it enters or exits from network interface in your Amazon VPC (Amazon Virtual Private Cloud). VPC Flow Logs can help you with a number of tasks, such as:
- Diagnosing overly restrictive security group rules
- Monitoring the traffic that is reaching your instance
- Determining the direction of the traffic to and from the network interfaces
This intake collects VPC Flow Logs that are delivered to an Amazon S3 bucket in the Apache Parquet format. Parquet is a columnar storage format that reduces the size of the delivered log files and speeds up their processing.
Configure
Deploying the Data Collection Architecture
This section will guide you through creating all the AWS resources needed to collect AWS logs. If you already have existing resources that you want to use, you may do so, but any potential issues or incompatibilities with this tutorial will be your responsibility.
Prerequisites
In order to set up the AWS architecture, you need an administrator access to the Amazon console with the permissions to create and manage S3 buckets, SQS queues, S3 notifications, and IAM identities.
Sekoia.io supports two authentication methods to access your AWS resources. Choose the one that best fits your security requirements:
| Method | Summary | When to use |
|---|---|---|
| IAM Role with OIDC (Recommended) | Sekoia.io assumes an IAM Role using short-lived credentials issued via OpenID Connect (OIDC). No long-lived access keys are stored. | Preferred for new setups and security-conscious environments |
| Static Access Keys | A dedicated IAM user authenticates with a static access key and secret. | Existing setups or environments where OIDC federation is not available |
This method uses OpenID Connect (OIDC) federation so that Sekoia.io can assume an AWS IAM Role and obtain short-lived credentials automatically. No long-lived access keys are stored in Sekoia.io.
Step 1 — Register Sekoia.io as an OIDC Identity Provider in AWS IAM
- Open the IAM console and navigate to Identity providers.
- Click Add provider and select OpenID Connect.
- Fill in the form:
- Provider URL:
https://app.sekoia.io/api/v1/symphony/oidc - Audience:
sts.amazonaws.com
- Provider URL:
- Click Add provider to confirm.
Once created, note the Provider ARN (e.g. arn:aws:iam::XXXXXXXXXXXX:oidc-provider/app.sekoia.io/api/v1/symphony/oidc). You will need it in the steps below.
Info
If you plan to use the Automatic CloudFormation deployment, Steps 2–4 (IAM Role creation) are handled by the stack. You can jump directly to the Deploy the S3 and SQS Infrastructure section after completing Step 1.
Step 2 — Create an IAM Role for Sekoia.io
- In the IAM console, navigate to Roles and click Create role.
- Select Web identity as the trusted entity type.
- Choose the
app.sekoia.io/api/v1/symphony/oidcidentity provider you just registered and set the audience tosts.amazonaws.com. -
Proceed to the Trust policy and replace its content with the following, substituting your AWS account ID, community UUID, and module configuration UUID:
{
    "Version": "2012-10-17",
    "Statement": [
        {
            "Effect": "Allow",
            "Principal": {
                "Federated": "arn:aws:iam::XXXXXXXXXXXX:oidc-provider/app.sekoia.io/api/v1/symphony/oidc"
            },
            "Action": "sts:AssumeRoleWithWebIdentity",
            "Condition": {
                "StringEquals": {
                    "app.sekoia.io/api/v1/symphony/oidc:aud": "sts.amazonaws.com"
                },
                "StringLike": {
                    "app.sekoia.io/api/v1/symphony/oidc:sub": "community:<COMMUNITY_UUID>:modconf:<MODULE_CONFIGURATION_UUID>"
                }
            }
        }
    ]
}
Step 3 — Attach a permission policy to the role
Attach an inline or managed policy granting the role access to the SQS queue and S3 bucket:
{
    "Version": "2012-10-17",
    "Statement": [
        {
            "Effect": "Allow",
            "Action": [
                "s3:PutObject",
                "s3:GetObject",
                "s3:ListBucket"
            ],
            "Resource": "arn:aws:s3:::NAME_HERE"
        },
        {
            "Effect": "Allow",
            "Action": [
                "sqs:GetQueueUrl",
                "sqs:ReceiveMessage",
                "sqs:DeleteMessage",
                "sqs:GetQueueAttributes"
            ],
            "Resource": "arn:aws:sqs:REGION_HERE:XXXXXXXXXXXX:NAME_HERE"
        }
    ]
}
Step 4 — Copy the Role ARN
After creating the role, note its ARN (e.g. arn:aws:iam::XXXXXXXXXXXX:role/ROLE_NAME). You will need it when configuring the connector in Sekoia.io.
Step 5 — Configure the Sekoia.io AWS module
In the Sekoia.io connector configuration, set the following fields:
- AWS Region (
aws_region_name): the AWS region where your resources are deployed (e.g.eu-west-1) - AWS Role ARN (
aws_role_arn): the ARN of the role you created above
Leave the Access Key and Secret Access Key fields empty — they are not used with this method.
Deploy the S3 and SQS Infrastructure
Once the IAM Role is configured, deploy the S3 bucket and SQS queue that will receive log notifications.
To get started, click on the button below and fill the form on AWS to set up the required environment for Sekoia 
You need to fill the following inputs:
Required:
- Stack name - Name of the stack in CloudFormation
- BucketName - Name of the S3 Bucket
- SQSName - Name of the SQS queue
- OIDCProviderArn - ARN of the Sekoia.io OIDC Identity Provider you created in Step 1 (e.g.
arn:aws:iam::XXXXXXXXXXXX:oidc-provider/app.sekoia.io/api/v1/symphony/oidc) - CommunityUUID - Your Sekoia.io Community UUID (find it in the Sekoia.io platform under your community settings)
- ModuleConfigurationUUID - Your Sekoia.io Module Configuration UUID (find it in the connector's configuration page). Use
*to allow all connectors within the community.
Optional:
- RoleName - Name of the IAM Role to create (default:
SekoiaIOConnectorRole)
Read the different pages and click on Next, then click on Submit.
You can follow the creation in the Events tab (it can take few minutes).
Once finished, it should be displayed on the left CREATE_COMPLETE. Click on the Outputs tab in order to retrieve the information needed for the Sekoia.io connector.
Create a S3 Bucket
Please refer to this guide to create a S3 Bucket.
Create a SQS queue
The collect will rely on S3 Event Notifications (SQS) to get new S3 objects.
- Create a queue in the SQS service by following this guide
- In the Access Policy step, choose the advanced configuration and adapt this configuration sample with your own SQS Amazon Resource Name (ARN) (the main change is the Service directive allowing S3 bucket access):
{
  "Version": "2008-10-17",
  "Id": "__default_policy_ID",
  "Statement": [
    {
      "Sid": "__owner_statement",
      "Effect": "Allow",
      "Principal": {
        "Service": "s3.amazonaws.com"
      },
      "Action": "SQS:SendMessage",
      "Resource": "arn:aws:sqs:XXX:XXX"
    }
  ]
}
Important
Keep in mind that you have to create the SQS queue in the same region as the S3 bucket you want to watch.
Info
No need to add a prefix in the notification configuration and you can select all S3 events
Info
If you want to use an SNS topic between S3 and SQS, you must enable the raw message delivery option in your SNS subscription configuration. Otherwise, the SQS queue will not be able to parse messages from the SNS topic and you will not receive any logs in Sekoia.io.
Create a S3 Event Notification
Use the following guide to create S3 Event Notification. Once created:
- Select the notification for object creation in the Event type section
- As the destination, choose the SQS service
- Select the queue you created in the previous section
This method authenticates using a dedicated IAM user with a static access key and secret access key stored in Sekoia.io.
Step 1 — Create a dedicated IAM user
Create a dedicated IAM user in the IAM console and generate programmatic access credentials (access key ID and secret access key) for that user.
Step 2 — Attach a resource-based policy to your SQS queue and S3 bucket
Ensure that the IAM user has the following permissions on your SQS queue and S3 bucket. You can apply these as a resource-based policy on each resource, substituting your account ID, username, region, and resource names:
{
    "Version": "2012-10-17",
    "Statement": [
        {
            "Effect": "Allow",
            "Action": [
                "sqs:ReceiveMessage", "sqs:DeleteMessage", "sqs:GetQueueUrl"
            ],
            "Principal": {
                "AWS": "arn:aws:iam::XXXXXXXXXXXX:user/USERNAME_HERE"
            },
            "Resource": "arn:aws:sqs:REGION_HERE:XXXXXXXXXXXX:NAME_HERE"
        },
        {
            "Effect": "Allow",
            "Action": [
                "s3:GetObject"
            ],
            "Principal": {
                "AWS": "arn:aws:iam::XXXXXXXXXXXX:user/USERNAME_HERE"
            },
            "Resource": "arn:aws:s3:::NAME_HERE/*"
        }
    ]
}
Step 3 — Configure the Sekoia.io AWS module
In the Sekoia.io connector configuration, set the following fields:
- AWS Region (
aws_region_name): the AWS region where your resources are deployed (e.g.eu-west-1) - Access Key (
aws_access_key): the access key ID of your IAM user - Secret Access Key (
aws_secret_access_key): the secret access key of your IAM user
Leave the AWS Role ARN field empty — it is not used with this method.
Deploy the S3 and SQS Infrastructure
Once the IAM user is configured, deploy the S3 bucket and SQS queue that will receive log notifications.
To get started, click on the button below and fill the form on AWS to set up the required environment for Sekoia
You need to fill 4 inputs:
- Stack name - Name of the stack in CloudFormation (Name of the template)
- BucketName - Name of the S3 Bucket
- IAMUserName - Name of the dedicated user to access the S3 and SQS queue
- SQSName - Name of the SQS queue
Read the different pages and click on Next, then click on Submit.
You can follow the creation in the Events tab (it can take few minutes).
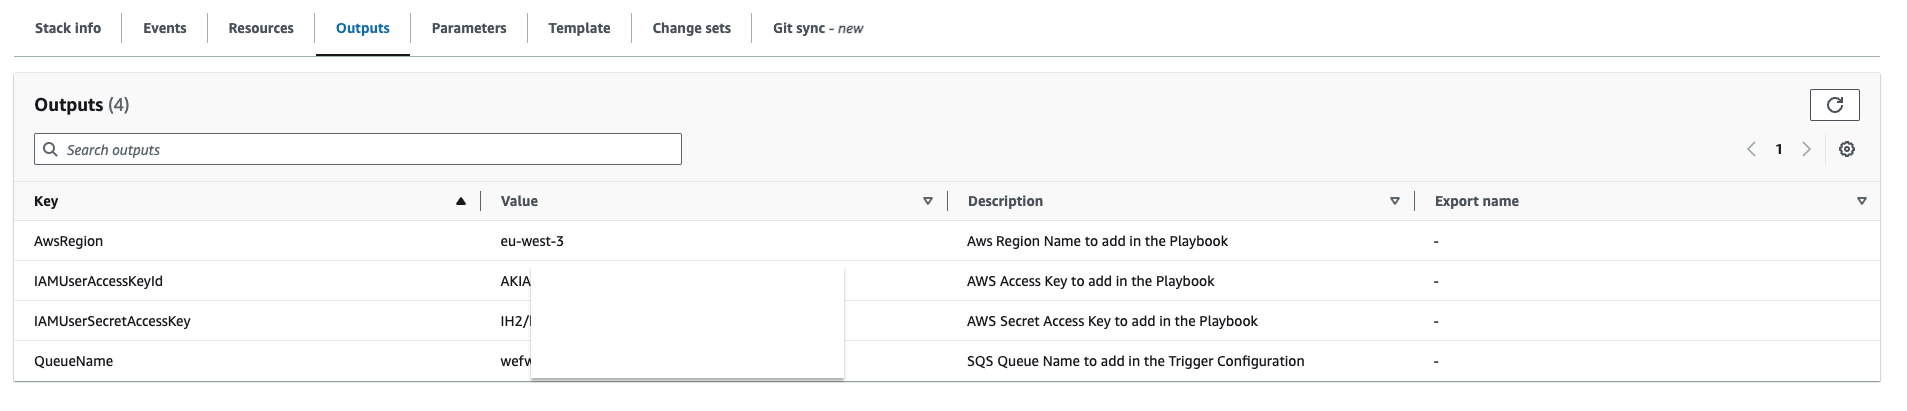
Once finished, it should be displayed on the left CREATE_COMPLETE. Click on the Outputs tab in order to retrieve the information needed for Sekoia playbook.
Create a S3 Bucket
Please refer to this guide to create a S3 Bucket.
Create a SQS queue
The collect will rely on S3 Event Notifications (SQS) to get new S3 objects.
- Create a queue in the SQS service by following this guide
- In the Access Policy step, choose the advanced configuration and adapt this configuration sample with your own SQS Amazon Resource Name (ARN) (the main change is the Service directive allowing S3 bucket access):
{
  "Version": "2008-10-17",
  "Id": "__default_policy_ID",
  "Statement": [
    {
      "Sid": "__owner_statement",
      "Effect": "Allow",
      "Principal": {
        "Service": "s3.amazonaws.com"
      },
      "Action": "SQS:SendMessage",
      "Resource": "arn:aws:sqs:XXX:XXX"
    }
  ]
}
Important
Keep in mind that you have to create the SQS queue in the same region as the S3 bucket you want to watch.
Info
No need to add a prefix in the notification configuration and you can select all S3 events
Info
If you want to use an SNS topic between S3 and SQS, you must enable the raw message delivery option in your SNS subscription configuration. Otherwise, the SQS queue will not be able to parse messages from the SNS topic and you will not receive any logs in Sekoia.io.
Create a S3 Event Notification
Use the following guide to create S3 Event Notification. Once created:
- Select the notification for object creation in the Event type section
- As the destination, choose the SQS service
- Select the queue you created in the previous section
VPC Flow Logs
As a prerequisite, you need an existing VPC, subnet or network interface (Elastic Load Balancing, Amazon RDS, Amazon ElastiCache, Amazon Redshift, Amazon WorkSpaces, NAT gateways, Transit gateways) to create a flow log. If you create a flow log for a subnet or VPC, each network interface in that subnet or VPC is monitored.
In the AWS console, navigate to: Services > VPC. From there, select the resource for which you want to capture information. The flow logs are available on the following resources: VPC, subnet, or network interfaces.
For VPC and subnet:
- Select the specific resource to monitor
- Go to the tab
Flow logs - Click on
Create flow log - Set up the flow log: we recommend to capture all traffic (accepted and rejected).
- In the
Destinationsection, selectSend to an Amazon S3 bucketand provide the ARN of the S3 bucket created previously. - In the
Log file formatsection, selectParquet.
Please follow this guide to configure and set up all the permissions needed.
Info
Amazon delivers VPC Flow Logs in Parquet format only when you explicitly select Parquet as the log file format when creating the flow log. Make sure the destination S3 bucket is the one watched by the SQS queue configured above.
Create the intake
- Go to the intake page and create a new intake from the format
AWS Flowlogs. - Set up the intake account configuration with the AWS Region and either:
- The AWS Role ARN (for OIDC authentication — recommended)
- The AWS Access Key and Secret Access Key (for static credentials)
- Set up the intake configuration with the name of the SQS queue.
Note
To collect the logs stored in Parquet format, this intake relies on the Fetch new FlowLogs Parquet records on S3 connector, which reads the Parquet objects notified by the SQS queue.
Raw Events Samples
In this section, you will find examples of raw logs as generated natively by the source. These examples are provided to help integrators understand the data format before ingestion into Sekoia.io. It is crucial for setting up the correct parsing stages and ensuring that all relevant information is captured.
2 1111111111 eni-0f06a40fc9be596f6 198.51.100.1 10.0.0.96 123 123 17 2 152 1599665193 1599665488 ACCEPT OK
5 1111111111 eni-1235b8ca123456789 5.6.7.8 1.2.3.4 50188 4433 6 1 44 1739865042 1739865042 ACCEPT OK vpc-1 subnet-1 - 2 IPv4 5.6.7.8 1.2.3.4 eu-west-1 euw1-az2 - - - - ingress -
{
    "version": 2,
    "account_id": "1111111111",
    "interface_id": "eni-0f06a40fc9be596f6",
    "srcaddr": "5.6.7.8",
    "dstaddr": "1.2.3.4",
    "srcport": 4712,
    "dstport": 53205,
    "protocol": 6,
    "packets": 12,
    "bytes": 2610,
    "start": 1661950735,
    "end": 1661950746,
    "action": "ACCEPT",
    "log_status": "OK"
}
5 1111111111 eni-1235b8ca123456789 198.51.100.1 10.0.0.71 46945 53 17 1 73 1658131186 1658131216 ACCEPT OK vpc-abcdefab012345678 subnet-aaaaaaaa012345678 - 0 IPv4 198.51.100.1 10.0.0.71 eu-west-1 euw1-az3 - - - - egress 8
2 1111111111 eni-1235b8ca123456789 2001:db8:1234:a100:8d6e:3477:df66:f105 2001:db8:1234:a102:3304:8879:34cf:4071 34892 22 6 54 8855 1477913708 1477913820 ACCEPT OK
{
    "version": 5,
    "account_id": "1111111111",
    "interface_id": "eni-1235b8ca123456789",
    "srcaddr": "1.2.3.4",
    "dstaddr": "5.6.7.8",
    "srcport": 25238.0,
    "dstport": 8080.0,
    "protocol": 6.0,
    "packets": 5.0,
    "bytes": 412.0,
    "start": 1726491185,
    "end": 1726491211,
    "action": "ACCEPT",
    "log_status": "OK",
    "vpc_id": "vpc-0123456789abcdefg",
    "subnet_id": "subnet-0123456789abcdefg",
    "instance_id": "-",
    "tcp_flags": 3.0,
    "type": "IPv4",
    "pkt_srcaddr": "1.2.3.4",
    "pkt_dstaddr": "5.6.7.8",
    "region": "eu-west-1",
    "az_id": "euw1-az3",
    "sublocation_type": "-",
    "sublocation_id": "-",
    "pkt_src_aws_service": "-",
    "pkt_dst_aws_service": "-",
    "flow_direction": "ingress",
    "traffic_path": null
}
2 1111111111 eni-1235b8ca123456789 - - - - - - - 1431280876 1431280934 - NODATA
2 1111111111 eni-0f06a40fc9be596f6 198.51.100.1 10.0.0.96 53996 20248 6 1 40 1599665374 1599665428 REJECT OK
{
    "version": 2,
    "account_id": "1111111111",
    "interface_id": "eni-0f06a40fc9be596f6",
    "srcaddr": "1.2.3.4",
    "dstaddr": "5.6.7.8",
    "srcport": 53094,
    "dstport": 2323,
    "protocol": 6,
    "packets": 1,
    "bytes": 40,
    "start": 1661950735,
    "end": 1661950746,
    "action": "REJECT",
    "log_status": "OK"
}
Detection section
The following section provides information for those who wish to learn more about the detection capabilities enabled by collecting this intake. It includes details about the built-in rule catalog, event categories, and ECS fields extracted from raw events. This is essential for users aiming to create custom detection rules, perform hunting activities, or pivot in the events page.
No related built-in rules was found. This message is automatically generated.
Event Categories
The following table lists the data source offered by this integration.
| Data Source | Description |
|---|---|
Host network interface |
every packets passing through the AWS account are logged |
Netflow/Enclave netflow |
AWS Flow Logs are Netflow-like |
Network device logs |
packets logged by Flow Logs |
Network protocol analysis |
traffic analysis at levels 2/3/4 |
In details, the following table denotes the type of events produced by this integration.
| Name | Values |
|---|---|
| Kind | `` |
| Category | ["network"] |
| Type | `` |
Transformed Events Samples after Ingestion
This section demonstrates how the raw logs will be transformed by our parsers. It shows the extracted fields that will be available for use in the built-in detection rules and hunting activities in the events page. Understanding these transformations is essential for analysts to create effective detection mechanisms with custom detection rules and to leverage the full potential of the collected data.
{
    "message": "2 1111111111 eni-0f06a40fc9be596f6 198.51.100.1 10.0.0.96 123 123 17 2 152 1599665193 1599665488 ACCEPT OK",
    "event": {
        "category": [
            "network"
        ],
        "end": "2020-09-09T15:31:28Z",
        "outcome": "ok",
        "start": "2020-09-09T15:26:33Z"
    },
    "@timestamp": "2020-09-09T15:26:33Z",
    "action": {
        "name": "accept",
        "outcome": "ok",
        "target": "network-traffic",
        "type": "forward"
    },
    "cloud": {
        "account": {
            "id": "1111111111"
        },
        "provider": "aws"
    },
    "destination": {
        "address": "10.0.0.96",
        "ip": "10.0.0.96",
        "port": 123
    },
    "network": {
        "iana_number": "17",
        "transport": "udp"
    },
    "observer": {
        "ingress": {
            "interface": {
                "name": "eni-0f06a40fc9be596f6"
            }
        }
    },
    "related": {
        "ip": [
            "10.0.0.96",
            "198.51.100.1"
        ]
    },
    "source": {
        "address": "198.51.100.1",
        "bytes": 152,
        "ip": "198.51.100.1",
        "packets": 2,
        "port": 123
    }
}
{
    "message": "5 1111111111 eni-1235b8ca123456789 5.6.7.8 1.2.3.4 50188 4433 6 1 44 1739865042 1739865042 ACCEPT OK vpc-1 subnet-1 - 2 IPv4 5.6.7.8 1.2.3.4 eu-west-1 euw1-az2 - - - - ingress -",
    "event": {
        "category": [
            "network"
        ],
        "end": "2025-02-18T07:50:42Z",
        "outcome": "ok",
        "start": "2025-02-18T07:50:42Z"
    },
    "@timestamp": "2025-02-18T07:50:42Z",
    "action": {
        "name": "accept",
        "outcome": "ok",
        "target": "network-traffic",
        "type": "forward"
    },
    "aws": {
        "flowlogs": {
            "subnet": {
                "id": "subnet-1"
            },
            "tcp_flags": 2,
            "vpc": {
                "id": "vpc-1"
            }
        }
    },
    "cloud": {
        "account": {
            "id": "1111111111"
        },
        "provider": "aws"
    },
    "destination": {
        "address": "1.2.3.4",
        "ip": "1.2.3.4",
        "port": 4433
    },
    "network": {
        "iana_number": "6",
        "transport": "tcp"
    },
    "observer": {
        "ingress": {
            "interface": {
                "name": "eni-1235b8ca123456789"
            }
        }
    },
    "related": {
        "ip": [
            "1.2.3.4",
            "5.6.7.8"
        ]
    },
    "source": {
        "address": "5.6.7.8",
        "bytes": 44,
        "ip": "5.6.7.8",
        "packets": 1,
        "port": 50188
    }
}
{
    "message": "{\"version\":2,\"account_id\":\"1111111111\",\"interface_id\":\"eni-0f06a40fc9be596f6\",\"srcaddr\":\"5.6.7.8\",\"dstaddr\":\"1.2.3.4\",\"srcport\":4712,\"dstport\":53205,\"protocol\":6,\"packets\":12,\"bytes\":2610,\"start\":1661950735,\"end\":1661950746,\"action\":\"ACCEPT\",\"log_status\":\"OK\"}\n",
    "event": {
        "category": [
            "network"
        ],
        "end": "2022-08-31T12:59:06Z",
        "outcome": "ok",
        "start": "2022-08-31T12:58:55Z"
    },
    "@timestamp": "2022-08-31T12:58:55Z",
    "action": {
        "name": "accept",
        "outcome": "ok",
        "target": "network-traffic",
        "type": "forward"
    },
    "cloud": {
        "account": {
            "id": "1111111111"
        },
        "provider": "aws"
    },
    "destination": {
        "address": "1.2.3.4",
        "ip": "1.2.3.4",
        "port": 53205
    },
    "network": {
        "iana_number": "6",
        "transport": "tcp"
    },
    "observer": {
        "ingress": {
            "interface": {
                "name": "eni-0f06a40fc9be596f6"
            }
        }
    },
    "related": {
        "ip": [
            "1.2.3.4",
            "5.6.7.8"
        ]
    },
    "source": {
        "address": "5.6.7.8",
        "bytes": 2610,
        "ip": "5.6.7.8",
        "packets": 12,
        "port": 4712
    }
}
{
    "message": "5 1111111111 eni-1235b8ca123456789 198.51.100.1 10.0.0.71 46945 53 17 1 73 1658131186 1658131216 ACCEPT OK vpc-abcdefab012345678 subnet-aaaaaaaa012345678 - 0 IPv4 198.51.100.1 10.0.0.71 eu-west-1 euw1-az3 - - - - egress 8",
    "event": {
        "category": [
            "network"
        ],
        "end": "2022-07-18T08:00:16Z",
        "outcome": "ok",
        "start": "2022-07-18T07:59:46Z"
    },
    "@timestamp": "2022-07-18T07:59:46Z",
    "action": {
        "name": "accept",
        "outcome": "ok",
        "target": "network-traffic",
        "type": "forward"
    },
    "aws": {
        "flowlogs": {
            "subnet": {
                "id": "subnet-aaaaaaaa012345678"
            },
            "tcp_flags": 0,
            "vpc": {
                "id": "vpc-abcdefab012345678"
            }
        }
    },
    "cloud": {
        "account": {
            "id": "1111111111"
        },
        "provider": "aws"
    },
    "destination": {
        "address": "10.0.0.71",
        "ip": "10.0.0.71",
        "port": 53
    },
    "network": {
        "iana_number": "17",
        "transport": "udp"
    },
    "observer": {
        "ingress": {
            "interface": {
                "name": "eni-1235b8ca123456789"
            }
        }
    },
    "related": {
        "ip": [
            "10.0.0.71",
            "198.51.100.1"
        ]
    },
    "source": {
        "address": "198.51.100.1",
        "bytes": 73,
        "ip": "198.51.100.1",
        "packets": 1,
        "port": 46945
    }
}
{
    "message": "2 1111111111 eni-1235b8ca123456789 2001:db8:1234:a100:8d6e:3477:df66:f105 2001:db8:1234:a102:3304:8879:34cf:4071 34892 22 6 54 8855 1477913708 1477913820 ACCEPT OK",
    "event": {
        "category": [
            "network"
        ],
        "end": "2016-10-31T11:37:00Z",
        "outcome": "ok",
        "start": "2016-10-31T11:35:08Z"
    },
    "@timestamp": "2016-10-31T11:35:08Z",
    "action": {
        "name": "accept",
        "outcome": "ok",
        "target": "network-traffic",
        "type": "forward"
    },
    "cloud": {
        "account": {
            "id": "1111111111"
        },
        "provider": "aws"
    },
    "destination": {
        "address": "2001:db8:1234:a102:3304:8879:34cf:4071",
        "ip": "2001:db8:1234:a102:3304:8879:34cf:4071",
        "port": 22
    },
    "network": {
        "iana_number": "6",
        "transport": "tcp"
    },
    "observer": {
        "ingress": {
            "interface": {
                "name": "eni-1235b8ca123456789"
            }
        }
    },
    "related": {
        "ip": [
            "2001:db8:1234:a100:8d6e:3477:df66:f105",
            "2001:db8:1234:a102:3304:8879:34cf:4071"
        ]
    },
    "source": {
        "address": "2001:db8:1234:a100:8d6e:3477:df66:f105",
        "bytes": 8855,
        "ip": "2001:db8:1234:a100:8d6e:3477:df66:f105",
        "packets": 54,
        "port": 34892
    }
}
{
    "message": "{\"version\":5,\"account_id\":\"1111111111\",\"interface_id\":\"eni-1235b8ca123456789\",\"srcaddr\":\"1.2.3.4\",\"dstaddr\":\"5.6.7.8\",\"srcport\":25238.0,\"dstport\":8080.0,\"protocol\":6.0,\"packets\":5.0,\"bytes\":412.0,\"start\":1726491185,\"end\":1726491211,\"action\":\"ACCEPT\",\"log_status\":\"OK\",\"vpc_id\":\"vpc-0123456789abcdefg\",\"subnet_id\":\"subnet-0123456789abcdefg\",\"instance_id\":\"-\",\"tcp_flags\":3.0,\"type\":\"IPv4\",\"pkt_srcaddr\":\"1.2.3.4\",\"pkt_dstaddr\":\"5.6.7.8\",\"region\":\"eu-west-1\",\"az_id\":\"euw1-az3\",\"sublocation_type\":\"-\",\"sublocation_id\":\"-\",\"pkt_src_aws_service\":\"-\",\"pkt_dst_aws_service\":\"-\",\"flow_direction\":\"ingress\",\"traffic_path\":null}",
    "event": {
        "category": [
            "network"
        ],
        "end": "2024-09-16T12:53:31Z",
        "outcome": "ok",
        "start": "2024-09-16T12:53:05Z"
    },
    "@timestamp": "2024-09-16T12:53:05Z",
    "action": {
        "name": "accept",
        "outcome": "ok",
        "target": "network-traffic",
        "type": "forward"
    },
    "aws": {
        "flowlogs": {
            "subnet": {
                "id": "subnet-0123456789abcdefg"
            },
            "tcp_flags": 3,
            "vpc": {
                "id": "vpc-0123456789abcdefg"
            }
        }
    },
    "cloud": {
        "account": {
            "id": "1111111111"
        },
        "provider": "aws"
    },
    "destination": {
        "address": "5.6.7.8",
        "ip": "5.6.7.8",
        "port": 8080.0
    },
    "network": {
        "iana_number": "6.0"
    },
    "observer": {
        "ingress": {
            "interface": {
                "name": "eni-1235b8ca123456789"
            }
        }
    },
    "related": {
        "ip": [
            "1.2.3.4",
            "5.6.7.8"
        ]
    },
    "source": {
        "address": "1.2.3.4",
        "bytes": 412.0,
        "ip": "1.2.3.4",
        "packets": 5.0,
        "port": 25238.0
    }
}
{
    "message": "2 1111111111 eni-1235b8ca123456789 - - - - - - - 1431280876 1431280934 - NODATA",
    "event": {
        "category": [
            "network"
        ],
        "end": "2015-05-10T18:02:14Z",
        "outcome": "nodata",
        "start": "2015-05-10T18:01:16Z"
    },
    "@timestamp": "2015-05-10T18:01:16Z",
    "action": {
        "outcome": "nodata",
        "type": "forward"
    },
    "cloud": {
        "account": {
            "id": "1111111111"
        },
        "provider": "aws"
    },
    "observer": {
        "ingress": {
            "interface": {
                "name": "eni-1235b8ca123456789"
            }
        }
    }
}
{
    "message": "2 1111111111 eni-0f06a40fc9be596f6 198.51.100.1 10.0.0.96 53996 20248 6 1 40 1599665374 1599665428 REJECT OK",
    "event": {
        "category": [
            "network"
        ],
        "end": "2020-09-09T15:30:28Z",
        "outcome": "ok",
        "start": "2020-09-09T15:29:34Z"
    },
    "@timestamp": "2020-09-09T15:29:34Z",
    "action": {
        "name": "reject",
        "outcome": "ok",
        "target": "network-traffic",
        "type": "forward"
    },
    "cloud": {
        "account": {
            "id": "1111111111"
        },
        "provider": "aws"
    },
    "destination": {
        "address": "10.0.0.96",
        "ip": "10.0.0.96",
        "port": 20248
    },
    "network": {
        "iana_number": "6",
        "transport": "tcp"
    },
    "observer": {
        "ingress": {
            "interface": {
                "name": "eni-0f06a40fc9be596f6"
            }
        }
    },
    "related": {
        "ip": [
            "10.0.0.96",
            "198.51.100.1"
        ]
    },
    "source": {
        "address": "198.51.100.1",
        "bytes": 40,
        "ip": "198.51.100.1",
        "packets": 1,
        "port": 53996
    }
}
{
    "message": "{\"version\":2,\"account_id\":\"1111111111\",\"interface_id\":\"eni-0f06a40fc9be596f6\",\"srcaddr\":\"1.2.3.4\",\"dstaddr\":\"5.6.7.8\",\"srcport\":53094,\"dstport\":2323,\"protocol\":6,\"packets\":1,\"bytes\":40,\"start\":1661950735,\"end\":1661950746,\"action\":\"REJECT\",\"log_status\":\"OK\"}\n",
    "event": {
        "category": [
            "network"
        ],
        "end": "2022-08-31T12:59:06Z",
        "outcome": "ok",
        "start": "2022-08-31T12:58:55Z"
    },
    "@timestamp": "2022-08-31T12:58:55Z",
    "action": {
        "name": "reject",
        "outcome": "ok",
        "target": "network-traffic",
        "type": "forward"
    },
    "cloud": {
        "account": {
            "id": "1111111111"
        },
        "provider": "aws"
    },
    "destination": {
        "address": "5.6.7.8",
        "ip": "5.6.7.8",
        "port": 2323
    },
    "network": {
        "iana_number": "6",
        "transport": "tcp"
    },
    "observer": {
        "ingress": {
            "interface": {
                "name": "eni-0f06a40fc9be596f6"
            }
        }
    },
    "related": {
        "ip": [
            "1.2.3.4",
            "5.6.7.8"
        ]
    },
    "source": {
        "address": "1.2.3.4",
        "bytes": 40,
        "ip": "1.2.3.4",
        "packets": 1,
        "port": 53094
    }
}
Extracted Fields
The following table lists the fields that are extracted, normalized under the ECS format, analyzed and indexed by the parser. It should be noted that infered fields are not listed.
| Name | Type | Description |
|---|---|---|
@timestamp |
date |
Date/time when the event originated. |
action.target |
keyword |
The target of the action |
aws.flowlogs.subnet.id |
keyword |
The ID of the subnet |
aws.flowlogs.tcp_flags |
number |
TCP flags |
aws.flowlogs.vpc.id |
keyword |
The ID of the VPC |
cloud.account.id |
keyword |
The cloud account or organization id. |
cloud.instance.id |
keyword |
Instance ID of the host machine. |
cloud.provider |
keyword |
Name of the cloud provider. |
destination.ip |
ip |
IP address of the destination. |
destination.port |
long |
Port of the destination. |
event.category |
keyword |
Event category. The second categorization field in the hierarchy. |
event.end |
date |
event.end contains the date when the event ended or when the activity was last observed. |
event.start |
date |
event.start contains the date when the event started or when the activity was first observed. |
network.iana_number |
keyword |
IANA Protocol Number. |
observer.ingress.interface.name |
keyword |
Interface name |
source.bytes |
long |
Bytes sent from the source to the destination. |
source.ip |
ip |
IP address of the source. |
source.packets |
long |
Packets sent from the source to the destination. |
source.port |
long |
Port of the source. |
For more information on the Intake Format, please find the code of the Parser, Smart Descriptions, and Supported Events here.